mardi, décembre 28, 2010
dimanche, décembre 19, 2010
jeudi, décembre 16, 2010
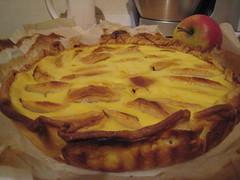
Tarte aux pomme 2
Second tarte aux pommes (apple pie) made it to this website :D
The recipe is taken from La cuisine de Monica. It's a great website (in french though) where the cook is a grandma and her grandson did the filming of the video and webstuff. Sadly, mamie Monica passed away 20th October 2010 :(
So here is the recipe...
Tarte aux pomme à la canelle
(Adapted from La cuisine de Monica)
Ingredients:
1 pie dough
5 apples
100g sugar
3 small eggs (or 2 if medium or large eggs0
200ml liquid cream
2 tsp cinnamon powder
2 tsp ground almond
Methods:
- Put the pie dough in the pie baking pan and put some weights (usually dried beans. I used almonds) and bake at 200C / 15min.
- Check that the dough is dry
- Take out from the oven and spread ground almond
- In a small bowl, mix 50g sugar and cinnamon powder
- Peel and cut the apples in 8 pieces. Arrange the apples on the pie dough. Add in the sugar/cinnamon mix.
- Bake for 10min à 200°C. The apples should be soft on the outside but still firm in the inside.
- In a mixing bowl, mix 50g sugar, eggs and the cream. Pour into the cooked apples.
- Bake for last time in the oven, this time at 180° for 30min. Check on the baking. You can do the toothpick test. The pie should be slightly brown.
Then it's time to dig in!!
vendredi, décembre 10, 2010
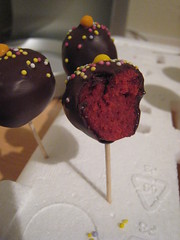
Dark Chocolate Red Velvet Cake Pops
This is my Saint Nicolas Bake Challenge. Today I had Saint Nicolas Office Party, so I decided few days ago that I will do cake pops. Cake pops are a huge trend in the US nowadays after the cupcakes phenomenon. I never feel attracted to do cupcakes challenge. I think the reason is the logistic issue. Frosted cupcakes are not easy to move from one place to another. So here I am jumping on the cake pops bandwagon!

Bakerella from bakerella.com had a huge success promoting cake pops. She published cake pops book and she appeared in Martha Stewart's show doing the muffin cake pops. The best and the worst about cake pops are that they are easy to make and you can do different kinds of varieties. You can use lemon cake, butter cake, chocolate cake, red velvet cake, orange cake... I mean anything. Then there is the decoration part. Americans use a lot of Candy Melts. These are sugar flavored pallets, kind of artificial chocolate pallets.
After so many research, I finally settled down with red velvet cake and dark chocolate cover.
Why red velvet cake?
- For sometimes I have been eyeing red velvet cake recipes. I like the rich red color of the cake and the fact that it's always frosted with cream cheese. Since the cake pop uses cream cheese frosting, so I think it is a good time to try this recipe.
Why dark chocolates?
- At first I decided to do white chocolate cover. But as I melt some white chocolates, it looks very thick. So I stopped and stored it. I've worked with a lot of dark chocolates lately and I feel more comfortable with dark chocolates.
Enough said.. Since I only have evening after work and gym to do this challenge, I decided to split the process into 3 parts. This recipe gives about 80-90 cake pops.
D-2
Part 1: Red Velvet Cake
Ingredients
2 1/2 cups cake flour (I used all-purpose flour and it works fine)
1 tsp baking powder
1 tsp salt
2 tbsp unsweetened cocoa powder
2 1-ounce bottle of red paste coloring
1 cup (225g) unsalted butter, room temperature
1 1/2 cups sugar
2 eggs, room temperature
1 tsp vanilla extract
1 cup buttermilk, room temperature
1 tsp baking soda
1 tsp white vinegar
Methods
- Butter and flour cake pan and set aside. Preheat oven to 170C.
- In a bowl, sift flour, baking powder, and salt.
- In another bowl, mix cocoa powder with food coloring.

- In a mixer, cream butter and sugar until fluffy. Add eggs on at a time, add vanilla, and the red cloring-cocoa mix.
- When mixture is well combined, add 1/3 of flour mix, mix well, then add 1/2 of buttermilk, then add 1/3 of flour mix, then other 1/2 butter milk, then finish off the flour mix (each time mix until well combined).
- In a small bowl, mix baking soda with vinegar, and quickly add to the batter.
- Mix in high speed for few seconds.
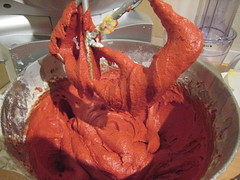
- Pour mixture into cake pan and bake for about 30-35 minutes (do the toothpick test).
- Let the cake cool at room temperature.
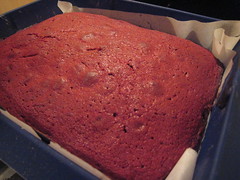
D-1
Part 2: Destroy the cake
Cream cheese frosting
2 250g cream cheese (usually Philadelphia)
56g unsalted butter, room temperature
2 tsp red coloring (this is optional - just to preserve the red coloring in the red velvet cake. If you are using butter cake or lemon cake, no need to add food coloring)
2 1/2 cups icing sugar (confectioners sugar)
pinch of salt
Methods
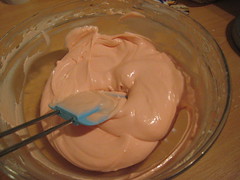
- In a mixer, combine cream cheese and butter, and beat until smooth
- Add vanilla, salt and gradually add in sugar, and coloring
- Take the red velvet cake, then crumble it. You may use spatula or give it a spin in the food mixer/food processor.
- In a big bowl, add in the frosting bit by bit into the cake crumbs.
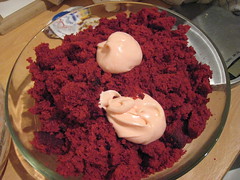
- Add in and mix well until all frosting are being used.

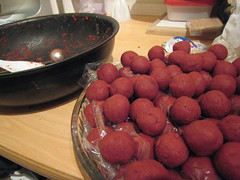
- Try rolling a small ball in your palms. If it stays together, and none stays on your palm, then it means your mixture is ready.
- Start making the balls with a size a bit smaller than size of a golf ball.
- Put those balls inside the fridge for about 1-2 hours.
Part 3: Assembling the pops
- Melt dark chocolates in bain marie, you may add a bit of butter to make it fluid a bit.
- Dip the tip of the stick in the chocolate, then pierce the chilled ball until 3/4 deep. Let it cool. This step is important to make sure the ball did not slide down the stick.
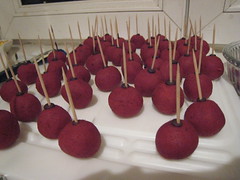
- Repeat the dipping stick and piercing until the last ball.
- Start with the first cake pop, dip the ball into the chocolate. Give it a swirl to get rid of any access chocolate.
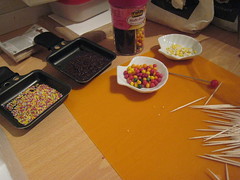
- Put it stand on a polysterine block. Decorate as you wish. I put a sugared cereal on top and sprinkle with colorful sugar sprinkles and chocolate sprinkles.
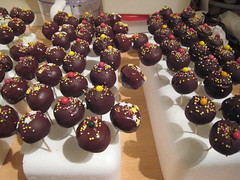
There you go!!! I would be happy to do these cake pops again :D
Bakerella from bakerella.com had a huge success promoting cake pops. She published cake pops book and she appeared in Martha Stewart's show doing the muffin cake pops. The best and the worst about cake pops are that they are easy to make and you can do different kinds of varieties. You can use lemon cake, butter cake, chocolate cake, red velvet cake, orange cake... I mean anything. Then there is the decoration part. Americans use a lot of Candy Melts. These are sugar flavored pallets, kind of artificial chocolate pallets.
After so many research, I finally settled down with red velvet cake and dark chocolate cover.
Why red velvet cake?
- For sometimes I have been eyeing red velvet cake recipes. I like the rich red color of the cake and the fact that it's always frosted with cream cheese. Since the cake pop uses cream cheese frosting, so I think it is a good time to try this recipe.
Why dark chocolates?
- At first I decided to do white chocolate cover. But as I melt some white chocolates, it looks very thick. So I stopped and stored it. I've worked with a lot of dark chocolates lately and I feel more comfortable with dark chocolates.
Enough said.. Since I only have evening after work and gym to do this challenge, I decided to split the process into 3 parts. This recipe gives about 80-90 cake pops.
D-2
Part 1: Red Velvet Cake
Ingredients
2 1/2 cups cake flour (I used all-purpose flour and it works fine)
1 tsp baking powder
1 tsp salt
2 tbsp unsweetened cocoa powder
2 1-ounce bottle of red paste coloring
1 cup (225g) unsalted butter, room temperature
1 1/2 cups sugar
2 eggs, room temperature
1 tsp vanilla extract
1 cup buttermilk, room temperature
1 tsp baking soda
1 tsp white vinegar
Methods
- Butter and flour cake pan and set aside. Preheat oven to 170C.
- In a bowl, sift flour, baking powder, and salt.
- In another bowl, mix cocoa powder with food coloring.
- In a mixer, cream butter and sugar until fluffy. Add eggs on at a time, add vanilla, and the red cloring-cocoa mix.
- When mixture is well combined, add 1/3 of flour mix, mix well, then add 1/2 of buttermilk, then add 1/3 of flour mix, then other 1/2 butter milk, then finish off the flour mix (each time mix until well combined).
- In a small bowl, mix baking soda with vinegar, and quickly add to the batter.
- Mix in high speed for few seconds.
- Pour mixture into cake pan and bake for about 30-35 minutes (do the toothpick test).
- Let the cake cool at room temperature.
D-1
Part 2: Destroy the cake
Cream cheese frosting
2 250g cream cheese (usually Philadelphia)
56g unsalted butter, room temperature
2 tsp red coloring (this is optional - just to preserve the red coloring in the red velvet cake. If you are using butter cake or lemon cake, no need to add food coloring)
2 1/2 cups icing sugar (confectioners sugar)
pinch of salt
Methods
- In a mixer, combine cream cheese and butter, and beat until smooth
- Add vanilla, salt and gradually add in sugar, and coloring
- Take the red velvet cake, then crumble it. You may use spatula or give it a spin in the food mixer/food processor.
- In a big bowl, add in the frosting bit by bit into the cake crumbs.
- Add in and mix well until all frosting are being used.
- Try rolling a small ball in your palms. If it stays together, and none stays on your palm, then it means your mixture is ready.
- Start making the balls with a size a bit smaller than size of a golf ball.
- Put those balls inside the fridge for about 1-2 hours.
Part 3: Assembling the pops
- Melt dark chocolates in bain marie, you may add a bit of butter to make it fluid a bit.
- Dip the tip of the stick in the chocolate, then pierce the chilled ball until 3/4 deep. Let it cool. This step is important to make sure the ball did not slide down the stick.
- Repeat the dipping stick and piercing until the last ball.
- Start with the first cake pop, dip the ball into the chocolate. Give it a swirl to get rid of any access chocolate.
- Put it stand on a polysterine block. Decorate as you wish. I put a sugared cereal on top and sprinkle with colorful sugar sprinkles and chocolate sprinkles.
There you go!!! I would be happy to do these cake pops again :D
dimanche, décembre 05, 2010
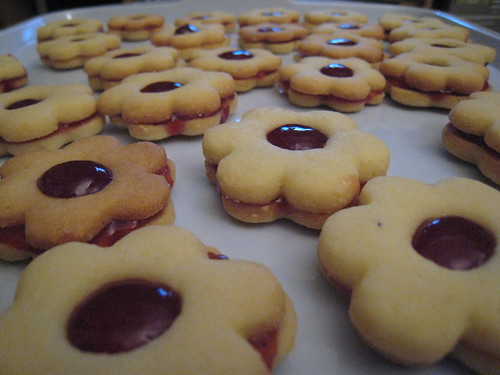
Jam cookies
Second recipe in winter Sunday is the Jam cookies. I made this type before when I was in Nancy. It was with cinnamon cookies and raspberry jam. This time, the recipe calls for usual buttery cookies with raspberry jam. Safe enough. But hubby asked me to make it with strawberry jam... Oh ok :D
The job is a bit tedious. First of all the mixture gives a big ball of dough. Then comes the cutting. Need to make the bottom part and the top part with hole in the middle. I need to keep in check the number of bottom part and number of top part. You don't want to have any topless or bottomless cookie with jam right? hehehehe The baking time is 10 mins max. So no time to sit down... By the time you clean up some stuff, it's time to unload and reload!
After that, there is the assembling part. For this I am already low in energy so I asked my helpful husband to help me. So, he did the spread and I put the top on. Phew!
But the look of the cookies and the taste... worth the while! :D
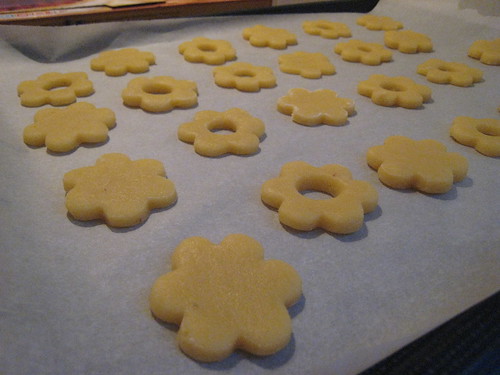
Need to check the same number of bottom and top
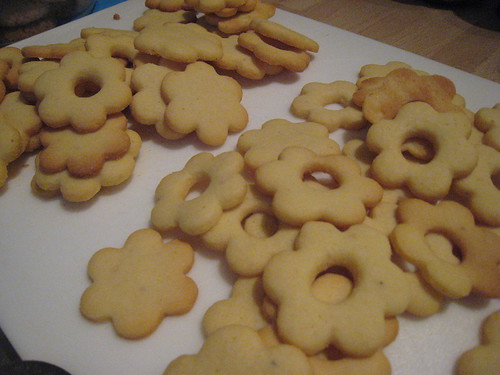
Let it cool down
My hand model showing the assembling job

Beauties
Here's the recipe:
(Adapted from magazine Vivre à table)
Ingredients:
420g flour
210g sugar
2 tsp vanilla sugar
A pinch of salt
125g ground hazelnuts (I used ground almonds)
250g cold butter
1/2 lemon, zest and juice (I used 2 tbsp lemon juice only)
2 eggs
Strawberry or raspberry jams
Icing sugar (optional)
Methods:
- In a bowl, mix the flour, the sugar, vanilla sugar, salt and ground almonds/hazelnuts.
- Add in cold butter (cut in cubes), lemon juice and eggs.
- Knead the mixture until you get a smooth dough.
- Leave the dough in the fridge for minimum of 30 mins (the longer the better)
- After min. of 30 mins, pre-heat oven at 190C.
- Roll out the dough into approx. 0.5 cm). Use the cookie cutter of your choice, the top part with hole in the middle.
- Bake between 8-10 minutes.
- Once the cookies are cool (after 1-2 hours), heat the jam in the microwave.
- Using small spoon, spread the jam on the bottom part cookie (without hole), then sandwich it with the top cookie (with hole).
The job is a bit tedious. First of all the mixture gives a big ball of dough. Then comes the cutting. Need to make the bottom part and the top part with hole in the middle. I need to keep in check the number of bottom part and number of top part. You don't want to have any topless or bottomless cookie with jam right? hehehehe The baking time is 10 mins max. So no time to sit down... By the time you clean up some stuff, it's time to unload and reload!
After that, there is the assembling part. For this I am already low in energy so I asked my helpful husband to help me. So, he did the spread and I put the top on. Phew!
But the look of the cookies and the taste... worth the while! :D
Need to check the same number of bottom and top
Let it cool down
My hand model showing the assembling job
Beauties
Here's the recipe:
(Adapted from magazine Vivre à table)
Ingredients:
420g flour
210g sugar
2 tsp vanilla sugar
A pinch of salt
125g ground hazelnuts (I used ground almonds)
250g cold butter
1/2 lemon, zest and juice (I used 2 tbsp lemon juice only)
2 eggs
Strawberry or raspberry jams
Icing sugar (optional)
Methods:
- In a bowl, mix the flour, the sugar, vanilla sugar, salt and ground almonds/hazelnuts.
- Add in cold butter (cut in cubes), lemon juice and eggs.
- Knead the mixture until you get a smooth dough.
- Leave the dough in the fridge for minimum of 30 mins (the longer the better)
- After min. of 30 mins, pre-heat oven at 190C.
- Roll out the dough into approx. 0.5 cm). Use the cookie cutter of your choice, the top part with hole in the middle.
- Bake between 8-10 minutes.
- Once the cookies are cool (after 1-2 hours), heat the jam in the microwave.
- Using small spoon, spread the jam on the bottom part cookie (without hole), then sandwich it with the top cookie (with hole).
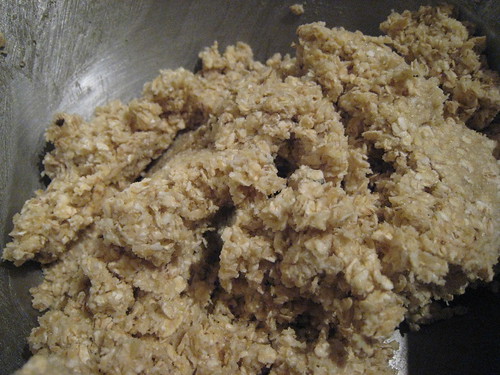
Oat Coconut Cookies
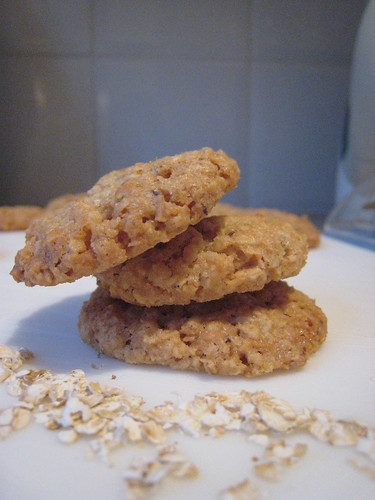
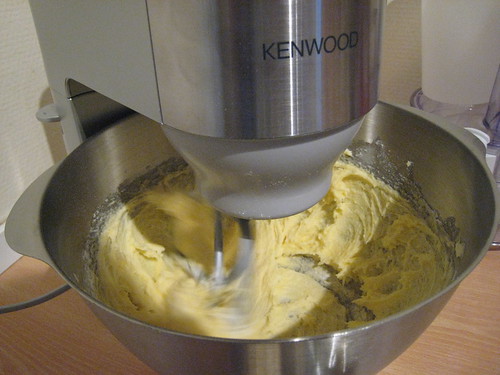
It guess it's time to start Xmas baking and using my new Kenwood that I got for birthday last month! For my birthday I also received several cooking magazines. One of the magazines has the recipes for Xmas cookings and bakes. After 2 weeks of "studying" the magazines, I finally picked up 2 recipes! Yippie!! The idea is to use up some of the things in my kitchen (except for butter and eggs), and did I mention the new Kenwood? :D hehehehe
One of the things is rolled oats, which was mistakenly bought few weeks ago. I always thought oat cookies are yummy. Never tried it before, so I guess it's time to do it. There is a recipe in the magazine, so I'm game!
First, the Kenwood beater :D I'm so nervous using it. First time is always like this I spose :D
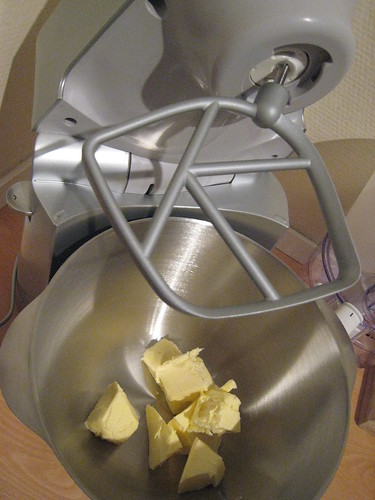
Look! Hands free!!!! Weeeee.....
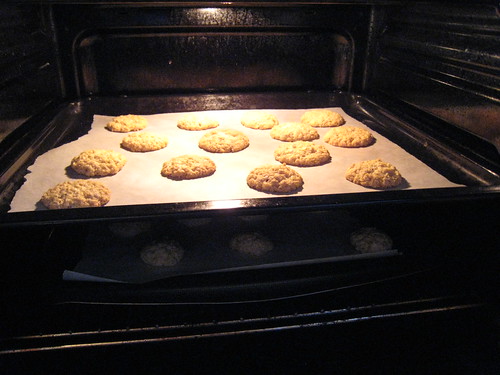
Ready for the oven...
Looks so great in the oven...
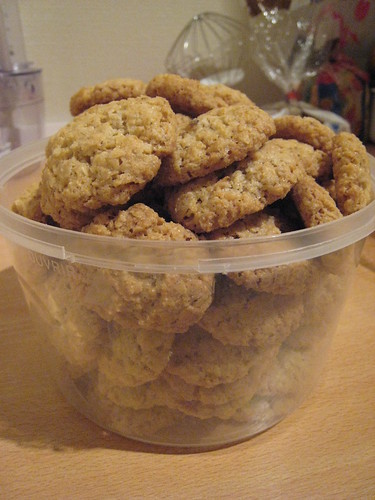
Bucket's of oat coconut cookies...
Here's the recipe:
(Adapted from magazine Vivre à table)
Ingredients:
200g butter
2 tsp vanilla sugar
200g sugar
A pinch of salt
1 egg
325g rolled oats
25g flour
50g dried coconut
1 tsp baking powder
Methods:
- Pre-heat oven at 190C.
- In a mixer, beat butter, vanilla sugar, sugar, salt and egg.
- Add in oats, coconuts, flour and baking powder.
- Knead until you get a well-mixed mixture.
- Roll mixture into small balls. Place them on the baking tray with enough space between then. The mixture will spread a bit.
- Bake for about 10-15 minutes.
- Take out from the oven and let cool.
Note: You can also replace the dried coconuts with almond flakes or hazelnut flakes.
Inscription à :
Articles (Atom)