Bakerella from bakerella.com had a huge success promoting cake pops. She published cake pops book and she appeared in Martha Stewart's show doing the muffin cake pops. The best and the worst about cake pops are that they are easy to make and you can do different kinds of varieties. You can use lemon cake, butter cake, chocolate cake, red velvet cake, orange cake... I mean anything. Then there is the decoration part. Americans use a lot of Candy Melts. These are sugar flavored pallets, kind of artificial chocolate pallets.
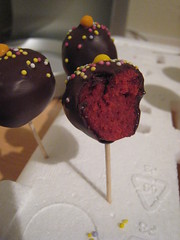
After so many research, I finally settled down with red velvet cake and dark chocolate cover.
Why red velvet cake?
- For sometimes I have been eyeing red velvet cake recipes. I like the rich red color of the cake and the fact that it's always frosted with cream cheese. Since the cake pop uses cream cheese frosting, so I think it is a good time to try this recipe.
Why dark chocolates?
- At first I decided to do white chocolate cover. But as I melt some white chocolates, it looks very thick. So I stopped and stored it. I've worked with a lot of dark chocolates lately and I feel more comfortable with dark chocolates.
Enough said.. Since I only have evening after work and gym to do this challenge, I decided to split the process into 3 parts. This recipe gives about 80-90 cake pops.
D-2
Part 1: Red Velvet Cake
Ingredients
2 1/2 cups cake flour (I used all-purpose flour and it works fine)
1 tsp baking powder
1 tsp salt
2 tbsp unsweetened cocoa powder
2 1-ounce bottle of red paste coloring
1 cup (225g) unsalted butter, room temperature
1 1/2 cups sugar
2 eggs, room temperature
1 tsp vanilla extract
1 cup buttermilk, room temperature
1 tsp baking soda
1 tsp white vinegar
Methods
- Butter and flour cake pan and set aside. Preheat oven to 170C.
- In a bowl, sift flour, baking powder, and salt.
- In another bowl, mix cocoa powder with food coloring.

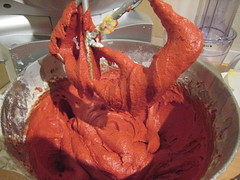
- In a mixer, cream butter and sugar until fluffy. Add eggs on at a time, add vanilla, and the red cloring-cocoa mix.
- When mixture is well combined, add 1/3 of flour mix, mix well, then add 1/2 of buttermilk, then add 1/3 of flour mix, then other 1/2 butter milk, then finish off the flour mix (each time mix until well combined).
- In a small bowl, mix baking soda with vinegar, and quickly add to the batter.
- Mix in high speed for few seconds.
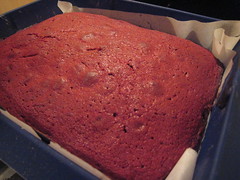
- Pour mixture into cake pan and bake for about 30-35 minutes (do the toothpick test).
- Let the cake cool at room temperature.
D-1
Part 2: Destroy the cake
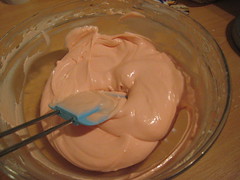
Cream cheese frosting
2 250g cream cheese (usually Philadelphia)
56g unsalted butter, room temperature
2 tsp red coloring (this is optional - just to preserve the red coloring in the red velvet cake. If you are using butter cake or lemon cake, no need to add food coloring)
2 1/2 cups icing sugar (confectioners sugar)
pinch of salt
Methods
- In a mixer, combine cream cheese and butter, and beat until smooth
- Add vanilla, salt and gradually add in sugar, and coloring
- Take the red velvet cake, then crumble it. You may use spatula or give it a spin in the food mixer/food processor.
- In a big bowl, add in the frosting bit by bit into the cake crumbs.
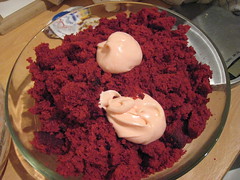
- Add in and mix well until all frosting are being used.

- Try rolling a small ball in your palms. If it stays together, and none stays on your palm, then it means your mixture is ready.
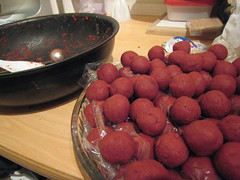
- Start making the balls with a size a bit smaller than size of a golf ball.
- Put those balls inside the fridge for about 1-2 hours.
Part 3: Assembling the pops
- Melt dark chocolates in bain marie, you may add a bit of butter to make it fluid a bit.
- Dip the tip of the stick in the chocolate, then pierce the chilled ball until 3/4 deep. Let it cool. This step is important to make sure the ball did not slide down the stick.
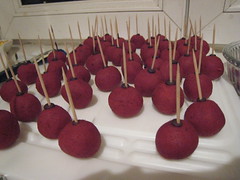
- Repeat the dipping stick and piercing until the last ball.
- Start with the first cake pop, dip the ball into the chocolate. Give it a swirl to get rid of any access chocolate.
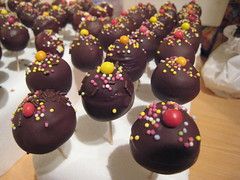
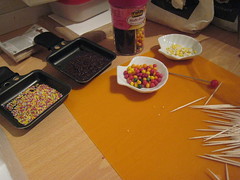
- Put it stand on a polysterine block. Decorate as you wish. I put a sugared cereal on top and sprinkle with colorful sugar sprinkles and chocolate sprinkles.
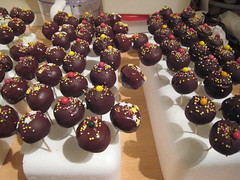
There you go!!! I would be happy to do these cake pops again :D
1 commentaire:
OUAH trop beau, ça à l'air trop bon!
Enregistrer un commentaire